Step 1

Begin by drawing a large circle, then divide that circle into four quarters. Draw two curved lines leading down from the base of your circle. (These will form your Koi's tail).
Step 2

Now you need to add the bottom of your Koi's tail. Try to copy this drawing as closely as possible. Next give your Koi a little more shape by drawing two lines, one on either side of the body, like so. These will form your Koi's cheeks.
Step 3

The next step is to draw on two roughly semi-circular shapes on either side of your Koi's head. Then draw on another semi-circle in the middle of the other two. This will form your Koi's crest. Draw on one extra line inside your Koi's head to create a triangle at the top.
Step 4

This next step is a bit tricky. You will need to draw on your Koi's arms. The best thing to do here would be to try and copy this picture as closely as possible. Once you have done that, draw two eye shapes , one on either side of the top face segments. Lastly draw your Koi's crooked smile.
Step 5

Your Koi drawing is getting very complicated, so now you need to erase all the extra lines. You should finish up with something very similar to this.
Step 6

Now add a little detail. Draw the spiky crest on the top of the head (use the semi-circle as a guide). Next give your eyes more detail by drawing in pupils, adding upper eyelids and eyebrows. Directly under the eyes draw on a small dot (this will be your Koi's nostrils). Lastly you need to finish off the mouth. Draw a curved line for the lower lip. Inside that draw two semi-circles to form a tongue.
Step 7

Your Koi should really be taking shape now. You will need to add more detail on the tail. Then use the hand shapes as a guide to draw the webbed fingers of your Koi. Try to keep within the semi-circles. Then move up to the fins on the top of the head. Use the semi-circular shapes as guides to draw the webbing.
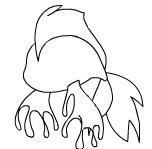
Step 8

Erase all the extra lines and you should have a perfectly formed Koi. Don't worry if it didn't work out first time. This is a particularly tricky one to do. With practice it will become much easier.
Step 9

If you want to really finish off your drawing, try adding colour and shading. This will really help to bring your Koi to life!


No comments:
Post a Comment